Category: Health & Beauty

New Year’s Resolutions: Setting and Achieving Realistic Goals

As the New Year unfolds, it brings with it a sense of renewal and the perfect opportunity to reflect on our past experiences. Many of us are eager to set resolutions that inspire growth and positive change. However, the challenge often lies not in the desire to improve, but in how we approach these goals. In this post, we’ll explore practical strategies for setting realistic New Year’s resolutions that you can actually stick to.

From utilizing the SMART criteria to breaking down larger goals into manageable tasks, we’ll provide you with actionable steps to help you stay motivated throughout the year. Whether you are aiming to enhance your health, boost your productivity, or culture new skills, these insights will empower you to make meaningful progress. Let’s embark on this journey together and turn those ambitious resolutions into achievable milestones.

My journey to Motherhood Pt 1

My journey to Motherhood Pt 1

Let’s talk about how I became a mother to two boys and another baby on the way. My fertility journey from PCOS to two boys and another baby on the way. I might have to break this story up into several posts because it spans my lifetime. However, I know a lot of people can relate to having difficulties getting pregnant so I wanted to share my journey. Let’s start with 5 years ago, in 2014.

The Beginning

I had been on birth control for a couple of years but knew it would probably be difficult to get pregnant when my husband and I were ready to have kids. I knew this because my periods before I got on birth control, were 50 to 75 days apart. Sometimes they were even 80 days apart sometimes less, but never regular.

When my husband of several years and I were ready to start trying, I got off birth control. At first, it seemed hopeful because things seem to start off on a good foot with my first cycle only being 48 days long. But the wait then began to elongate. ..

I got off birth control in May, and by October nothing had happened, and I had only had two cycles. I began to look for an answer to what I figured would be a diagnosis of PCOS.

PCOS is Polycystic ovary syndrome. Basically, it means there are cysts on my ovaries that interfere with fertility. I began to track my periods and track all of the signs of fertility.

What was my body and its fertility doing?

As time ticked away, I began to learn a lot about fertility and my body. I started charting and tracking all my fertility signs. I began learning that my body didn’t have a problem after I ovulated except for a low progesterone level. In addition to that, my main and most glaring problem was that it took forever for me to ovulate. I would have a period, then 40+ days would go by before my body even thought about ovulating. Then I would ovulate, and 13 to 14 days later I would have my period.

This made it difficult getting pregnant because it was so long between ovulations. For other people, they can try once a month. Mine was once every 2 to 3 months. Besides this, I was experiencing low cervical fluid levels and low progesterone levels after ovulation.

I was discouraged but not giving up because I knew that everything was in God’s hands. He is the ultimate authority to my fertility, and no matter what happened I would learn to trust him with this. If you are feeling discouraged, I wrote this blog post about some ways to deal with it.

What do I do?

The first thing I did after temping and learning more about my body was looking into natural remedies. I stumbled upon a herb called Vitex via a facebook group I was in. After learning about it, I began to dig dipper into vitex. I learned what it was, what it was thought to do, and possible side effects and how it might help me. In the research, I found that Vitex had similar properties to the prescription Clomid and I became hopeful this was the answer.

PCOS Cycle

Throughout this journey, my husband and I were seeking answers from God. Asking for His guidance, and trusting that in the right time all things would come together. Whether that be through natural remedies, or through a doctor’s help.

Here is a screenshot of my cycles from 2014 to present.

My Fertility Journey with Vitex

After getting vitex and adjusting the dosage to be what I thought was a good amount, I hit my first stumbling block. 4 days after ovulating, I got super dizzy. I ended up going to the ER. They gave me some medicine to help me with the dizziness and nauseous but didn’t have a specific reason for why I was dizzy. I knew, though, based on the fact that I had just started the vitex and ovulated, it must have been caused by the vitex dosage.

I laid on the couch for 4 days miserable and unable to go to work or stand because of the dizziness. Finally, the problems seem to subside and things returned to normal. After this, I adjusted the dosage down a bit and did not experience another dizzy spell. I hit another wall though.

My next cycle was 100 days long. With things not seeming to be getting better I finally decided it was time to see a doctor and figure out what they could do. I made my appointment and describe the symptoms I was experiencing.

She was very nice and ran some tests but almost immediately diagnosed me with PCOS. She prescribed Metformin to me and mentioned Clomid. After discussing both options with her, I decided to hold off on Clomid and see how the Metformin worked. I knew from my research of the Vitex that I couldn’t take Clomid and Vitex at the same time. In addition to that, She mentioned that I could only take Clomid for a couple of cycles because of possible cancer risks.

That scared me and I decided to wait and do more research on the Clomid. I thought it would be good to start with Metformin before jumping to something that drastic. I say drastic because of the limited use options and possible cancer risks.

Fertility and Adding in Metformin

I continued to take my vitamins, the vitex, but now I added in the Metformin. It was February/March. I had been off birth control since May of the previous year and had only a mere 5 cycles in that time period.

Metformin is a diabetic medicine that doctors will prescribe to people with PCOS as an off label use. People with PCOS are shown to be insulin resistant and medicine helps reduce the insulin levels in the blood, thereby assisting infertility issues that are caused by high insulin levels.

Finally, after just two weeks on Metformin, I got a positive pregnancy test. I was over the moon! Now all I had to do was get through the pregnancy and meet my new beautiful baby. Or so I thought…

Continue the journey with me next week in the next blog post…

PCOS cycles
Slim Sonic by Violife – the one travel toothbrush kit You need

Slim Sonic by Violife – the one travel toothbrush kit You need

Traveling can be hard, especially with the travel regulations they have on liquids and checked baggage. Packing doesn’t have to be a hassle though when you have the right items. That’s where this amazing Slim Sonic electric toothbrush comes in handy. This is a review of the VioLife Slim Sonic toothbrush which I received complimentary.

All views expressed in this review are my own and does not represent that of Vio Life or any other third party. 

The Packaging

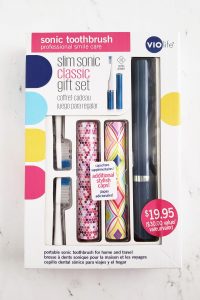
I received the VioLife Slim Sonic in a beautiful plastic box that holds the toothbrush and accessories perfectly. With a window to see all the pieces, it makes it easy to store the product when you aren’t using it or as a great gift set.

My Vio Life Slim Sonic came with three interchangeable toothbrush heads, one AAA battery, three different colored caps, instructions and the toothbrush base. The three different caps are great for switching out based on the day or trip depending on your mood. I noticed that the website showed different colors than the ones I received. I do love these but would’ve loved the lip cap shown on the website.

Out of the cap colors I received, my favorite one is the multicolored purple hexagon pattern. I will definitely be using that cap the most! The main reason I love the caps is that I always feel gross having my toothbrush loose in with my other toiletries. I feel like it is just collecting germs in there. With these caps, I don’t have to worry about that!

How it works

The great thing about this toothbrush is the power it packs. After using it, I felt like my teeth were silky smooth clean. It even managed to clean in-between my teeth pretty well. This may very well become my main toothbrush. So, if you want a great travel electric toothbrush that won’t break the bank, this is a great option. It is also great for as a gift!

Check out more of Vio Life’s products on their site at www.violife.com, #violife #slimsonic #oralcare

If you want to read more of my product reviews, check out this one on my favorite pair of sunglasses, My Girl style by Vivienfang.


Boscia Black Charcoal Mask Review

Boscia Black Charcoal Mask Review

I’m so excited to share this review with you! I’ve been wanting to try out this face mask for several months now especially the pink one. So, I am super excited because I finally am getting able to try and review the Boscia Black Charcoal mask.

I love face masks and have been using them a lot more recently since giving birth to my son. They just make me feel so refreshed after having a long night with him. They also make my skin feel and look renewed.

I’ve mainly been using the wash off kind, but I love the peel masks because of all the stuff they pull from your skin.  It’s especially fun to start peeling it and I have a hard time waiting for it to dry.

The Boscia Black Charcoal Mask Review

Application

I started with a clean dry face. To apply, I just squeezed a little of the mask onto my finger at a time and started applying. It went on without any problems.

There is little to no scent with it, so I didn’t feel overwhelmed by smell while I applied or had it on. I do love the way some masks smell, so this was a slight disappointment. However, it didn’t affect my overall love of the Boscia Black Charcoal mask.

I made sure to stay clear of my under eye area and any skin too sensitive that it would be painful to pull the mask away from. I made sure that I applied a good thick mask. You do not want peel away masks too thin or they are more painful to remove and don’t work as well.

The Drying Time

I did feel like it took a good bit of time for the Boscia Black Charcoal mask to dry. I just took a bath and played with my son while I waited. It wasn’t inconvenient, but I planned for it to take time. I’d say overall it took 30-45 minutes to dry completely.

Just make sure when you do it, you allow adequate drying time. The same thing goes for Making it too thin, if you don’t let it dry adequately then it doesn’t remove properly.

The Removal

This is the fun part! I thought that it was going to be extremely painful and tedious to peel it off. That has been my experience with other peel off face masks, and the look in peoples’ eyes when you see the video of them removing it.

However, that was definitely not the case for me. I think it was because of the two pointers I included earlier: keeping it away from the sensitive skin around my eyes and making sure I applied a thick enough layer.

It came off pretty easily and with little to no pain. I am very impressed! I felt like my skin instantly looked more luminous too!

I haven’t been drinking the amount of water I should, but after this mask, you would never be able to tell that. I keep catching glimpses of myself in the mirror and just love how my skin looks.

I definitely recommend getting some of the Boscia Black Charcoal Mask for yourself. You won’t regret it. I now have on my list to get the pink one, too! Let me know if you try it out and what you think of it either here in the comments or on my social media pages.

Side note, this past Friday I thought I was getting a sore throat. I looked at my tongue and it was almost completely coated white. So, I dipped my toothbrush into some Apple Cider Vinegar and brushed my tongue. I did it several times, rinsing in-between, and my throat is no longer scratchy and white. The stuff is pure gold! You can read more about why what I love Apple Cider Vinegar here on my two favorite natural beauty hacks blog post.


Boscia Charcoal Mask Review


Please note that I received this product complimentary from Influenster for testing purposes. All opinions expressed in this blog post are my own and not that of anyone else or the company. I did not get paid for writing this besides receiving the product for free. 
My Daily Makeup Routine and how I minimize my pores

My Daily Makeup Routine and how I minimize my pores


I went through my daily makeup routine and wanted to put this post together for you. Lately, I’ve been trying different ways to minimize my pores because they seem distinct. I’ve watched a couple of youtube videos and checked out different makeup products. So, I am going to include what I’ve learned and implemented into my beauty routine to diminish and minimize my pores. Here we go, from start to finish my daily makeup routine and how I minimize my pores.

First, Prime Your Skin – Minimize Your Pores

I put on face lotion first to prime my skin. I used to have really bad acne due to my hormones and PCOS. Since discovering the Unblemish routine by Rodan + Fields, it has completely cleared my skin. In the Unblemish Routine, they have a face lotion. I mix that with a little bit of clean & clear dual action moisturizer. I mix it because it makes the R+F lotion last longer thereby saving money. Both are great moisturizers and SPF blockers. Plus, a bonus is that both keep my skin from soaking up all the makeup causing more breakouts.

Second, I prime my skin with pore minimizing remedy. In the past, I’ve tried and used a couple of different ones. My two top favorites are Senegence Silk Pore & Wrinkle Minimizer, and Pore Professional by Benefit. I’ve learned you should let these sit for a few minutes and then move on to your makeup. I take a dab, rub it into my pores in a downward motion and let sit for a few minutes.

Second, the Foundation and Powders

I’ve gone through phases with my foundation. As I mentioned, I’ve had really bad acne in the past and originally I only used Bare Minerals. I thought it would help keep my skin clear. It didn’t. Then, I switched to Dr. Jart BB Creams. My favorite is the Dis-a-Pore Beauty Balm. It has so many good qualities for your skin and I love that it is a BB Cream so it feels light and doesn’t seem to clog my pores. I’ve been wearing it for the past 3 years or so until I switched to the Senegence Anti-Aging Foundation.

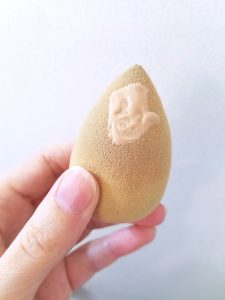
To apply my foundation and minimize my pores, I wet a blending sponge and put my Senegence AA Foundation and a dab of makeup mood enhancer by .em Michelle Phan. I mix the two together with the end of my eyeshadow brush. I do this not so much for the enhancer but because the foundation color is a little too dark for my skin tone and instead of waste it or send it back I just lighten it.

Minimizing my pores is a basic two-step process. Add the pore minimizer and apply my makeup by dabbing with a blending sponge instead of a makeup brush. In some of the youtube videos I watched, one tip was to then bake a powder to further minimize pores. I just don’t because it is an extra step, and sometimes I don’t have the time to do it.

Dabbing the beauty blender on my forehead, cheeks, and chin with the foundation I begin to blend it onto my skin. I continue to blend and dab it all over until my foundation is applied. It is amazing the difference in coverage I get with the real foundation versus the BB Cream! For that reason, I sometimes still just wear the BB Cream because taking it off at night is less troublesome than the foundation.

Next, I contour my face with Too Faced Chocolate Soleil and Mac highlighter. I also apply Bellapierre cosmetic blush. I apply the Chocolate Soleil to my cheeks, the side of my nose, my chin and the top of my forehead. Then, I apply the mac highlighter to the tip of my nose, the top of my cheeks, and my jawline to under my cheeks. As I said, I treat these more as a contouring kit than bronzer and highlighter.

Third, the Eyes & Eyebrows


I apply an eyebrow pencil to my eyebrows not to draw them on but to fill in the holes from my crazy eyebrow hairs. I then blend it in with a brush wand. It helps the color not be too dark and tame the brows.

Following this, I will apply my eyeliner. The very best eyeliner, in my humble opinion, is the Eyeko Fat Liquid Eyeliner. It has a marker tip, so it makes applying it straight and even super easy. I usually pull my eye to the side to make it a tighter surface to apply to. After applying the black to the top lid, I sometimes put a little on the bottom lid lash line and then smudge it with a straight eyeshadow brush. Alternatively and/or additionally, I will sometimes apply a white eyeliner to my waterline to brighten my eyes.

To finish it off, I apply my mascara. My everyday mascara is Smashbox X-Rated. You can see my top three mascaras in this blog post here. I’m all about mascara that adds drama and volume even for my everyday look. This is more often my final step when I am talking about my everyday makeup routine. My non-everyday makeup routine would include applying Lipsense and mixing in some eyeshadows.

I would love to hear how you do your makeup or how you have found best minimize your pores. I am still learning, but I feel like these few tips and tricks seem to go a long way for me. Connect with me via social media or comment below!

My Three Favorite Mascaras You Need To Try Now

My Three Favorite Mascaras You Need To Try Now

Why You Should Be Using These Mascaras!

I love the false lash look, even for everyday wear. Have you scrolled through Pinterest and seen what long lashes does to a face? You look sultry, sexy and appealing in every way. Something about it just draws you in and makes you stand out. My lashes aren’t short but they are not super long either.

Beauty Tip – to apply mascara go horizontal on your lashes then go vertical to give them the most definition.

The three mascaras that I am about to talk about I received samples of in my paid subscription to Ipsy and Birchbox. I’m providing links to purchase them, but they retail at your local stores or you can find them online.

Eyeko Black Magic Mascara

I got this Mascara in my Ipsy or Birchbox a few years ago and it quickly became my favorite!

It added such drama to my lashes. At the end of the day, I checked for smudging and wear surprised that there were no flakes and it appeared as voluminous as at the beginning of the day. It is definitely a mascara that you will want to go out in. Dramatically transforming ho-hum lashes to va-va-voom! I felt like it was as close to false lashes as I was going to get with a mascara.

To top it off it has a lot of benefits in this formula. You get conditioning via Keratin and Shea Butter. The brush lifts to add volume and curl to your lashes without the need of an eyelash curler. It is water-resistant and paraben-free.

You can get it here or from your favorite makeup retailers.


They’re Real by Benefit Cosmetics


These also are great for giving you that false lash looks with just mascara. It lengthens, curls, volumizes, lifts and separates the lashes for a going out kind of look. The best part of this mascara is the brush. I feel like I get more of my lashes than I do with other mascaras leading to a more defined and dramatic look. This mascara also stays on all day with no smudging or flaking.

The only con I’ve come across with this mascara is that it stays on almost too well. Even with make-up remover, I have a hard time removing all of it. Pro, It acts like a primer and mascara. 


Smashbox X-Rated Mascara

This one has been my daily go-to for several months now. Smashbox X-Rated Mascara feels more like an everyday mascara than they’re real. It gives me all the drama I am looking for but doesn’t take as much work to get off as They’re Real mascara. I do love the eyeko mascara the best, but Smashbox and They’re Real are a close second favorite.

It claims to give you massive volume with a single layer to drama-city the more you layer it on. The brush helps separate your lashes and get coated with the formula to help create that build-able look.

It also does not flake or smudge and lasts all day long. Recommended application is to roll the brush-up and out working from the base to the end of the lashes.


Check out these three mascaras for yourself. You won’t be disappointed with the results of any of the three for volume, drama, and that false lash look. Check out my favorite sweater this winter and other blog posts here.

Let me know which one is your favorite in the comments or connect with me on social media.

My Top Two Natural Beauty Hacks that I can’t Live Without

My Top Two Natural Beauty Hacks that I can’t Live Without

Natural Remedies for Common Beauty Ailments

Everyone has something they love. I’m all for beauty regiments and beauty supplies. There are two products that I use from natural products that I could never substitute anything for. That is Coconut Oil and Apple Cider Vinegar are two of the most underutilized natural beauty hacks for women today.

Everyone wants soft, shiny, silky hair and pay hundreds of dollars a year to achieve that. I’ve found that a $6 bottle of Coconut Oil is a great hair treatment to give you soft, smooth, and silky hair. Right from the cooking aisle!

In addition to that, women suffer all too often from yeast infections or other types of ph imbalance in their lady areas. Its a shame that we have to suffer so much!

I’ve discovered that Apple Cider Vinegar naturally balances your PH and heals things that might otherwise go south! Again, this is under $10 purchase!

Coconut Oil and Apple Cider Vinegar are my top two natural beauty hacks that I swear I will never go without again. Here is why:

1. Coconut Oil for Dry and Damaged Hair

Okay, so, my hair has always been dry. I’ve been dying it since I was 12 years old. Definitely chocking The ever loving life out of my hair. The good thing about it being dry is that I am able to style it in a variety of styles without it falling out of the clips or pins holding it in place. However, who wants to go around with dry hair that you can’t run your hands through and tangles easily? No One!

Coconut Oil Hair TreatmentSo, after pinteresting galore, I found someone recommending coconut oil treatments. I thought, “what the heck, I’ll give it a try.” I went to Wal Mart, where I buy most everything and checked out their beauty aisles for a hair conditioning treatment.

Why in the world does the coconut conditioning treatment consist of Coconut oil and lubricant? Also, it was this tiny bottle for God knows how much! I quickly maneuvered myself on over to the baking aisle and bought myself a nice bottle of Coconut oil for a fraction of the cost.. plus, no lubricant! So, I felt like I was wasting less money.

When I got home, I went to work. Putting some of the coconut oil into my hands, I warmed it by rubbing it together. I experimented a couple of different ways of heating it. I tried the microwave and found that it just was too much. So, I’ve stuck to just putting it in my hands and warming it then applying it to my dry and thirsty hair. It’s a process, but it gets the job done.

I started doing coconut oil treatments 6 years ago now. My hair is much softer. It grows a lot longer than it used too, and in general is much healthier! You have got to try it for yourself! You’ll be hooked!

How to apply the conditioning treatment

To do it just buy coconut oil from the cooking and baking aisle, as I mentioner. They do have coconut oil down the beauty aisle, but it has lubricant in it and you don’t need to pay for fillers. It will be a solid substance depending on the temperature of your house. Just put some on your hands and rub together then apply to hair.

I usually put a ton in my hair til it looks like a greasy mess. Then, you just let it sit for a while – 10 minutes, overnight, whatever. I have had good results with doing it right before a shower, but the best results are when I let it sit overnight. If you do them weekly or bi-weekly, the shorter times will be just as effective.

After I wash it out, shampooing and conditioning my hair like normal in the shower, my hair is silky smooth and soft!

Definitely a noticeable difference. You do need to do it regularly if you have dry hair like me. I try to do it at least once a week but really only end up doing it maybe once every month or so.

Here is a great coconut oil off of Amazon you can order: Garden of Life Organic Extra Virgin Coconut Oil – Unrefined Cold Pressed Coconut Oil for Hair, Skin, and Cooking, 14 Ounce

Or, just get your local store brand bottle of coconut oil off the baking aisle.

Here is an article on 77 other ways you can use coconut oil in your beauty and health regimen.

2. Apple Cider Vinegar

This is a miracle vinegar! Yes, it has a nasty smell but it is a lifesaver. I used to get yeast infections and bacterial infections all the time. I mean like every three months. Yuck!

I would go to the doctor, and they would prescribe me the antibiotic. The infection would go away and then come back a few months later. It was miserable and expensive. So, I started doing research. I added vitamins to my daily regimen and then found the ACV baths as a natural remedy.

Apple Cider Vinegar Bath


How to

You just run yourself a hot bath or warm, whatever, just run yourself a bath. Add a few glugs of Apple Cider Vinegar to your bath and soak for 30 minutes.

What it does is it balances your bodies natural PH and kills off any bad bacteria. If you have a smell down there, it will kill the germs and clear it right up!

I swear by this stuff. It’s amazing! I just use store brand Apple Cider Vinegar, nothing special. Or, here is a great one-off of Amazon you can order: Bragg USDA Gluten Free Organic Raw Apple Cider Vinegar, With the Mother 16 ounces

Try these two things out and let me know what you think. You will be surprised at the difference it makes in your hair and your nether regions.

Here is an article that tells you 30 more ways in depth to use Apple Cider Vinegar around the house. Both coconut oil and apple cider vinegar are so versatile. You will quickly wonder what you did without them!

Check out our blog for more articles on art, beauty, and fashion.