
When I first started calligraphy, a big trend was drawing a beautiful script design and adding foil to it. I was in love! It looked so easy and I loved the finished product. My only problem was the cost involved in getting the equipment to foil things. As I followed people on Instagram and learned more about it, I found that people had some hacks for getting the job done. So, here is how to add foil to your favorite print and design.
The equipment you will need:
- Laser printer (not inkjet! Laser!)
Example: Brother HL-L2320D Mono Laser Printer - Minc Reactive Foil
Comes in a variety of colors. I use Light Pink Minc Reactive Foil 12.25″-Light Pink 10′ Rolland Rose Gold Heidi Swapp MINC Application Machine Reactive Foil by American Crafts | 12-inch x 120-inch Rose Gold Foil Roll
- Computer to print from
- LaminatorAmazonBasics Thermal Laminator
Optional:
- ipad pro and procreate app
- ipad pencil
The Process
1. Create, design or draw what you want to foil
I do this by using my iPad pro and pencil and drawing a design in the Procreate app. You can create any design you want though. All you need to make sure is that it is in Black and White. The foil will adhere to the image where the black laser ink is printed. I’ve also used apps like Photofy to create text that I want to be foiled.
For example, I can print off a black clip art lip with a white text overlay. After I foil it, the white text will be negative space and the black lips will be where the foil ends up.
Note: If you use more intricate designs than the foil will try to mimic that. Example of that being, if you have a gradient, it will apply more foil to the darker area and less to the lighter area.
2. Print with a laser printer
 After I have created the design, I will transfer it to my computer. I do this by emailing it to myself or sending it to myself via text or Google Hangouts. There are a multitude of ways to transfer the file, comment below if you need help with this step.
I then lay it out on a page how I want it to be printed. If it was a simple calligraphy design, I would have drawn it or designed it on an 8.5″x11″ sheet of canvas. But, for something like creating stickers or labels or something I want multiples of, I will lay it out in a program like InDesign.
Side Note: Since I am a graphic designer, I have Adobe Creative Suite and the programs that come with it. Some alternates to Illustrator would be Procreate on the Ipad or even Paper 53 on the iPad. If you need other computer version alternatives here is a list of alternates.
After I have it laid out, I will simply click print on my Brother Mono Laser 2320. The mono portion means that my laser printer only prints in black and white. Laser printers can be expensive and so I strictly use my laser printer for things I want to foil. All my other black and white or color pages I want to be printed, I print from my HP inkjet printer.
Funny Story: When I originally went out to purchase the stuff for foiling, I thought I was purchasing a laser printer but ended up buying the HP Inkjet one. I tried to foil something and the foil would not adhere to the ink. Trying to a couple of different solutions, I was at a loss for what to do. So, I contacted the person that I saw using a laminator to see if they could help me figure out what I did wrong. I felt like an idiot for sure when I realized my mistake! So make sure the printer you are getting is a laser printer and uses toner not ink.
3. Lay foil on top of the design
This is the easy and the hard part. On Instagram, a lot of people will cut full page sized sheets of their foil and send it through the laminator. I like to be more efficient than that and only use the size of foil that my image is.
To do this: Measure your wording or image. For me, let’s say I am working on my 2×4 lip stickers, so I’ll need foil about 2″ x 2.5″. I’ll measure and cut the foil down to that size and it creates less waste. Be careful that you don’t cut it too close to your design but give yourself a border around the image. This will help make sure if something shifts you catch the full print with the foil.


Put the shiny part facing up and the other side down on your laser print. That is, put the color you want to see, i.e. the rose gold, facing up and the other side down on your image.
4. Put through a laminator
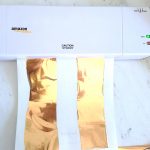
 I don’t use one of those folders for laminators but you can. Depending on the size of your image, print, and foil you can do it a couple different ways. If it is a normal piece of paper, you might want to adhere your foil in place with washi tape so that it doesn’t shift when it is put through the laminator. Or, as I mentioned, use one of those folders to put it into and then put it through the laminator.
5. Peel foil off and enjoy!
After it has gone through the laminator, all you have to do is carefully pull back the foil and reveal the image below. Discard foil and hang around your house or sell the art for everyone to enjoy! These five steps should be super easy to follow for how
to foil your favorite print or design.


Super easy, right?
I hope this tutorial for how to foil your favorite print was helpful and that you run out and get all the supplies today! Overall, you can get started for just under $150. Which, considering the cost for just a Minc Foiler is $100 plus the purchase of a laser printer, you are getting at least 25-50% off. Watch for deals on laser printers and get them when they are on sale, that will help you cut down the startup cost, too!
I’d love to see what you end up foiling and hear your thoughts on this hack. Check out my tips for getting started with fashion illustration here. Comment below or connect with me on Instagram or Facebook.
Xoxo
 sx
sx